The GS1 DataBar is a family of barcodes that is used widely in retail and healthcare. It encodes more information than traditional barcodes such as the UPC or EAN. The GS1 DataBar has several variations, each designed to fulfill different requirements for different applications. This document will delve into the encoding mechanisms of the GS1 DataBar, covering the basics of its encoding process, and then providing detailed examples. |
|
Overview of GS1 DataBar |
GS1 DataBar barcodes are designed to hold more information than traditional barcodes while occupying less space. There are several types of GS1 DataBar barcodes, including: |
GS1 DataBar Omnidirectional GS1 DataBar Stacked Omnidirectional GS1 DataBar Truncated GS1 DataBar Stacked GS1 DataBar Limited GS1 DataBar Expanded GS1 DataBar Expanded Stacked |

|
Structure of GS1 DataBar |
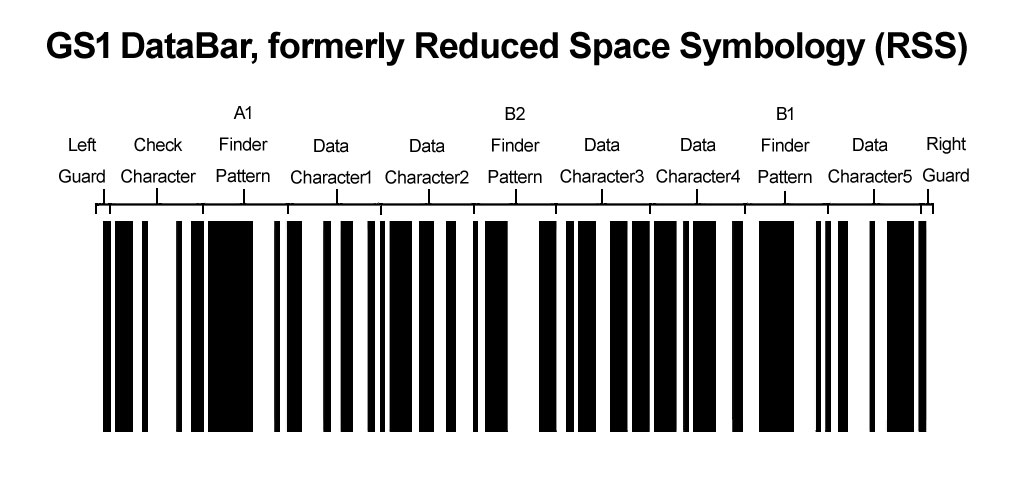
GS1 DataBar barcodes are designed using a modular approach where each module is a basic unit (either a bar or a space). The encoding of data involves the following key components: |
1.Symbology Identifier: Indicates the type of barcode symbology. 2.Data Characters: These are the characters that encode the data. 3.Check Characters: These are used for error detection. 4.Finder Patterns: These help barcode scanners locate the barcode and orient the reading process. 5.Quiet Zones: These are mandatory blank spaces before and after the barcode to ensure it is read correctly. |

|
Encoding Process |
The encoding process for GS1 DataBar involves several steps, including data preparation, data compaction, error detection and correction, and finally, barcode construction. Let's go through these steps in detail. |
1. Data Preparation |
Data preparation involves converting the input data into a form that can be encoded by the barcode. This usually involves the following steps: |
Data Normalization: Ensuring the input data conforms to the expected format. Prefixing: Adding necessary prefixes such as the Application Identifier (AI) for GS1 systems. |
For example, if we need to encode a GTIN (Global Trade Item Number), we would add the AI '01' before the GTIN. |
Example: Input GTIN: 01234567891234 Normalized Data: 0101234567891234 |

|
2. Data Compaction |
Data compaction involves converting the prepared data into a compact form that uses fewer bits. GS1 DataBar uses a complex scheme that divides the data into segments and encodes them using a combination of numeric and alphanumeric representations. |
GS1 DataBar Omnidirectional and other linear variants use a numeric encoding scheme where each digit is represented by a specific combination of bars and spaces. |
For the GS1 DataBar Expanded, which can encode alphanumeric data, the compaction process may involve using ASCII values or other encoding mechanisms. |
Example for GS1 DataBar Omnidirectional: Normalized Data: 0101234567891234 Compacted Data: Binary representation of each digit |

|
3. Error Detection and Correction |
Error detection and correction are crucial for ensuring the integrity of the data encoded in the barcode. GS1 DataBar uses check characters for this purpose. These characters are calculated using specific algorithms and appended to the data before encoding. |
For GS1 DataBar, the check character calculation can be complex, involving modular arithmetic and weighting factors. |
Example: Data to be encoded: 0101234567891234 Check Character: Calculated using the GS1 DataBar algorithm |

|
4. Barcode Construction |
The final step involves constructing the barcode using the prepared, compacted, and error-checked data. This involves placing the data characters, check characters, finder patterns, and quiet zones in their respective positions. |
For GS1 DataBar Omnidirectional, the barcode consists of 4 segments: |
Left Guard: Finder pattern to indicate the start of the barcode. Left Data: Encoded data characters. Right Data: Encoded data characters. Right Guard: Finder pattern to indicate the end of the barcode. |
Example: Data to be encoded: 0101234567891234 with check character Barcode Construction: Placing the data characters and finder patterns in the correct positions. |

|
Detailed Encoding Example |
Let's go through a detailed example to illustrate the encoding process. |
Example Data: GTIN: 01234567891234 |
Step-by-Step Encoding: |
1.Data Preparation: Normalize the data by adding the AI. Normalized Data: 0101234567891234 |
2.Data Compaction: Convert each digit into its binary representation. GS1 DataBar Omnidirectional uses numeric encoding where each digit is represented by a combination of 4 bars and spaces. For simplicity, let's assume a simple binary encoding (the actual encoding involves specific patterns for each digit). |
3.Error Detection and Correction: Calculate the check character using the GS1 DataBar algorithm. Assume the check character is '5' (the actual calculation is more complex). |
4.Barcode Construction: Construct the barcode by placing the finder patterns, data characters, and check characters. The barcode will look something like this (simplified): |
| Left Guard | 0101 0101 0111 0011 0101 0111 0010 0100 0110 0100 0101 0111 0010 0100 | Check Char | Right Guard | |

|
Variants of GS1 DataBar |
Different variants of the GS1 DataBar have specific encoding rules and patterns. Here's a brief overview of some key variants: |
GS1 DataBar Omnidirectional |
Data Encoding: Uses a numeric encoding scheme. Finder Patterns: Placed at the beginning and end of the barcode. Check Characters: Included for error detection. Example Usage: Retail point-of-sale where the barcode needs to be read in any direction. |
GS1 DataBar Stacked Omnidirectional |
Data Encoding: Similar to the Omnidirectional variant but stacked in two rows. Finder Patterns: Placed at the beginning and end of each row. Check Characters: Included for error detection. Example Usage: Small packages where space is limited. |
GS1 DataBar Truncated |
Data Encoding: Numeric encoding with a truncated design to save space. Finder Patterns: Placed at the beginning and end of the barcode. Check Characters: Included for error detection. Example Usage: Healthcare applications where barcode size is critical. |
GS1 DataBar Expanded |
Data Encoding: Can encode alphanumeric data. Finder Patterns: Placed at the beginning and end of the barcode. Check Characters: Included for error detection. Example Usage: Coupons and other applications requiring more data. |

|
Detailed Encoding for GS1 DataBar Expanded |
To illustrate the encoding process for a GS1 DataBar Expanded, let's go through an example encoding an alphanumeric string. |
Example Data: Product Code: 12345ABC |
Step-by-Step Encoding: |
1.Data Preparation: Normalize the data by adding the AI. Normalized Data: 12345ABC |
2.Data Compaction: Convert each character into its ASCII value. ASCII values: 49 (1), 50 (2), 51 (3), 52 (4), 53 (5), 65 (A), 66 (B), 67 (C) Convert ASCII values into binary representation. |
3.Error Detection and Correction: Calculate the check character using the GS1 DataBar Expanded algorithm. Assume the check character is '6' (the actual calculation is more complex). |
4.Barcode Construction: Construct the barcode by placing the finder patterns, data characters, and check characters. The barcode will look something like this (simplified): |
| Left Guard | 110001 110010 110011 110100 110101 1000001 1000010 1000011 | Check Char | Right Guard | |

|
Error Detection and Correction Details |
The error detection and correction mechanism in GS1 DataBar uses check characters calculated through a weighted sum of the data characters. The algorithm involves: |
1.Assigning weights to each data character. 2.Calculating the weighted sum of the characters. 3.Performing modular arithmetic to derive the check character. |
Example Calculation: Data: 0101234567891234 |
Weights: {2, 3, 4, 5, 6, 7, 8, 9, 10, 11, 12, 13, 14, 15, 16, 17} |
Weighted Sum Calculation: 0*2 + 1*3 + 0*4 + 1*5 + 2*6 + 3*7 + 4*8 + 5*9 + 6*10 + 7*11 + 8*12 + 9*13 + 1*14 + 2*15 + 3*16 + 4*17 = 0 + 3 + 0 + 5 + 12 + 21 + 32 + 45 + 60 + 77 + 96 + 117 + 14 + 30 + 48 + 68 = 628 |
Modular Calculation (Assume Modulus 103): Check Character: 628 % 103 = 6 |

|
Conclusion |
Encoding a GS1 DataBar involves several intricate steps, including data preparation, data compaction, error detection and correction, and barcode construction. Each step ensures that the data is accurately represented and can be reliably read by scanners. The examples provided illustrate how the data is transformed and encoded into the barcode format, ensuring that it adheres to the GS1 standards. Different variants of GS1 DataBar, such as Omnidirectional, Stacked, Truncated, and Expanded, have specific encoding rules tailored to their application requirements. Understanding these encoding mechanisms is crucial for leveraging the full potential of GS1 DataBar in various industries. |
 cs@easiersoft.com