Introduction to MSI Barcode |
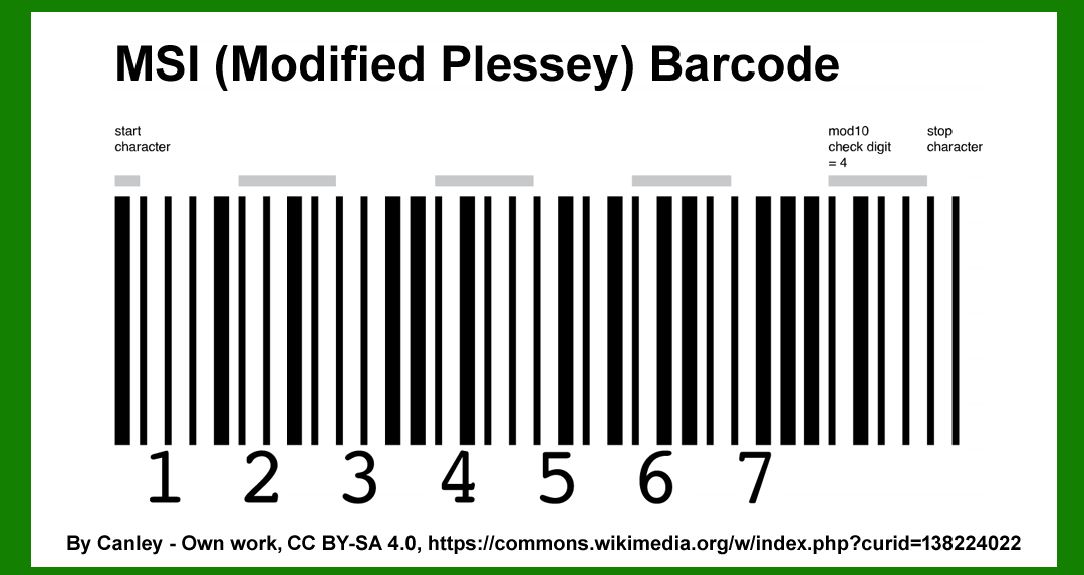
The MSI (Modified Plessey) barcode is a continuous, variable-length symbology originally designed by the Plessey Company in the 1970s. MSI barcodes are primarily used for inventory control, store shelf labeling, and other retail applications. The encoding process of MSI involves converting numeric data into a series of bars and spaces of varying widths, which can then be scanned and interpreted by barcode readers. |
|
Character Set and Structure |
MSI barcodes encode only numeric data (digits 0-9). Each digit is represented by a sequence of four bars and four spaces, with each bar or space being either narrow or wide. The structure of an MSI barcode can be divided into several key components: |
1.Start Sentinel: A unique pattern indicating the beginning of the barcode. 2.Data Digits: The numeric data to be encoded. 3.Check Digit(s): One or more check digits for error detection, typically calculated using modulo 10 or modulo 11 algorithms. 4.Stop Sentinel: A unique pattern indicating the end of the barcode. |

|
Encoding Process |
Step 1: Converting Data Digits to Binary Patterns |
Each digit in the MSI barcode is converted to a binary pattern consisting of four bars and four spaces. The patterns for the digits 0-9 are as follows: |
0: 100100100100 1: 100100100110 2: 100100110100 3: 100100110110 4: 100110100100 5: 100110100110 6: 100110110100 7: 100110110110 8: 110100100100 9: 110100100110 |
In these patterns, '1' represents a narrow bar, '0' represents a narrow space, '11' represents a wide bar, and '00' represents a wide space. |

|
Step 2: Calculating Check Digits |
MSI barcodes often use check digits to enhance error detection. There are two common methods for calculating check digits in MSI barcodes: modulo 10 and modulo 11. |

|
Modulo 10 Check Digit Calculation: |
1.Starting from the rightmost digit, assign alternating weights of 2 and 1 to each digit. 2.Multiply each digit by its assigned weight. 3.Sum the results of the multiplications. 4.The check digit is the amount needed to bring the sum to the next multiple of 10. |
Example: |
Consider the data digits '12345': |
1.Assign weights: 1 (5), 2 (4), 1 (3), 2 (2), 1 (1) 2.Multiply and sum: 11 + 22 + 13 + 24 + 1*5 = 1 + 4 + 3 + 8 + 5 = 21 3.The next multiple of 10 is 30, so the check digit is 30 - 21 = 9. |

|
Modulo 11 Check Digit Calculation: |
1.Starting from the rightmost digit, assign decreasing weights from 2 to 7 repeatedly. 2.Multiply each digit by its assigned weight. 3.Sum the results of the multiplications. 4.The check digit is the remainder when the sum is divided by 11. If the remainder is 10, the check digit is usually set to 0. |
Example: |
Consider the data digits '12345': |
1.Assign weights: 2 (5), 3 (4), 4 (3), 5 (2), 6 (1) 2.Multiply and sum: 16 + 25 + 34 + 43 + 5*2 = 6 + 10 + 12 + 12 + 10 = 50 3.The remainder of 50 divided by 11 is 6, so the check digit is 6. |

|
Step 3: Encoding Start and Stop Sentinels |
The start and stop sentinels are unique patterns that signal the beginning and end of the barcode. In MSI, the start sentinel is typically represented by the binary pattern '110', and the stop sentinel by '1001'. |

|
Step 4: Constructing the Full Barcode |
To construct the full barcode, the start sentinel, data digits (including check digit), and stop sentinel are concatenated. Each digit is represented by its corresponding binary pattern. |
Example: |
Consider the data digits '12345' with a modulo 10 check digit: |
1.Data digits: '12345' 2.Check digit: 9 3.Full data: '123459' |
4.Binary patterns: 1: 100100100110 2: 100100110100 3: 100100110110 4: 100110100100 5: 100110100110 9: 110100100110 |
5.Concatenate with start and stop sentinels: Start sentinel: 110 Data: 100100100110 100100110100 100100110110 100110100100 100110100110 110100100110 Stop sentinel: 1001 |
The final binary pattern for the barcode '12345' with a check digit of 9 would be: 110 100100100110 100100110100 100100110110 100110100100 100110100110 110100100110 1001 |

|
Example Encoding Process |
To illustrate the encoding process in more detail, let's go through another example step-by-step. |
Example: Encoding the Data '9876' with a Modulo 10 Check Digit |
1.Convert Data Digits to Binary Patterns: 9: 110100100110 8: 110100100100 7: 100110110110 6: 100110110100 |
2.Calculate Modulo 10 Check Digit: Data digits: '9876' Assign weights: 1 (6), 2 (7), 1 (8), 2 (9) Multiply and sum: 16 + 27 + 18 + 29 = 6 + 14 + 8 + 18 = 46 The next multiple of 10 is 50, so the check digit is 50 - 46 = 4. |
3.Convert Check Digit to Binary Pattern: 4: 100110100100 |
4.Construct Full Barcode: Start sentinel: 110 Data: 110100100110 (9) 110100100100 (8) 100110110110 (7) 100110110100 (6) 100110100100 (4) Stop sentinel: 1001 |
The final binary pattern for the barcode '9876' with a check digit of 4 would be: 110 110100100110 110100100100 100110110110 100110110100 100110100100 1001 |

|
Detailed Steps with Visual Representation |
To further clarify the encoding process, let's break down each step with visual representations. |
Step 1: Start Sentinel |
The start sentinel '110' indicates the beginning of the barcode. It is represented by: 110 | | | |
Step 2: Data Digits Each data digit is converted to its corresponding binary pattern: |
Digit 9: Binary: 110100100110 Visual: || || || | |
Digit 8: Binary: 110100100100 Visual: || || || |
Digit 7: Binary: 100110110110 Visual: | ||| ||| |
Digit 6: Binary: 100110110100 Visual: | ||| || |
Step 3: Check Digit |
The check digit is calculated and added to the data: |
Check Digit 4: Binary: 100110100100 Visual: | || || |
Step 4: Stop Sentinel |
The stop sentinel '1001' indicates the end of the barcode. It is represented by: 1001 | | | |
Final Barcode Visual Representation |
Combining all components, the final visual representation of the barcode '9876' with a check digit of 4 would be: |
110 110100100110 110100100100 100110110110 100110110100 100110100100 1001 | | || || || || || || | ||| ||| | ||| || | || || | |

|
Conclusion |
Encoding an MSI barcode involves converting numeric data into binary patterns, calculating check digits for error detection, and combining these elements with start and stop sentinels to create the final barcode. Each digit is represented by a unique sequence of bars and spaces, allowing for accurate scanning and interpretation by barcode readers. This process ensures the reliable encoding of numeric data for various applications, such as inventory control and retail. |
 cs@easiersoft.com